Lesson 35 — Sleight of Hand with Cards
LESSON 35
SLEIGHT OF HAND WITH CARDS
Card Manipulation has always been very popular with conjurors. You can be a good magician without these sleights, but I am sure you will want to add them to your repertoire so that you can use them from time to time. To be an expert card manipulator, is of course, a great accomplishment, and if it is your desire to become one, this lesson will prove invaluable to you.
To become an expert in Sleight of Hand with Cards requires:
First: A careful analysis of the sleights.
Second: PRACTICE!
You cannot hope to become an expert card manipulator over night, nor in a week. The muscles of your hands must be trained gradually. At first your fingers will feel stiff and clumsy; but each time you practice, the moves become easier, more natural, and finally you find yourself doing them gracefully and well. It will give you keen pleasure to see the wonderful progress you make each time you practice these sleights.
Some performers use Hind's "Honey and Almond Cream" or some other good skin lotion on their hands just before doing manipulative work. You will find that it will help you, too.
The best cards to use are soft, uncalendered ones as they are more pliable than the enameled cards. Steamboat cards are most satisfactory. Cards with red and black plaid backs are popular because they are less visible in sleights than others.
All the sleights taught to you in this lesson are done with unprepared cards. Many of the sleights are not tricks in themselves, but are used in conjunction with tricks. They are all an important part of your magical education whether you perfect yourself in them or not.
Back and Front Hand Palming
EFFECT: Performer takes a card or several cards between his thumb and fingers. With a slight wave of the hand, cards disappear. Magician turns his hand over and shows that they are not on the back. He continues to show back and front of hand empty, then suddenly produces the cards at his finger-tips. To Perform:
Start with a single card. After you have become proficient with one, try two, three, and as many as you can handle.
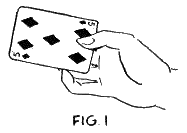
Turn left side toward audience. Hold right hand out from body. Place a card in right hand between thumb and finger-tips, Figure 1.
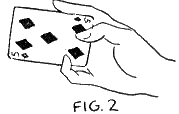
Bring first finger over upper edge of card and little finger over lower edge, Figure 2.
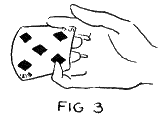
Curl second and third fingers under back of card and release thumb from card, Figure 3.
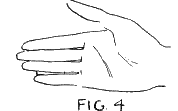
Straighten second and third fingers and card is brought automatically to back of hand, Figure 4.
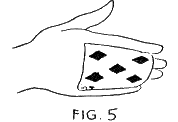
Figure 5 shows view away from audience. Card is held on back of hand, clipped between first and second fingers and between third and fourth fingers at about the first joints.
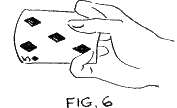
To bring card back to front of hand, curl fingers in toward palm and place thumb on front of card, see Figure 6.
Hold card securely gripped and move fourth and first fingers along the edges almost up to the corners, Figure 7.
Straighten second and third fingers and with tips of these fingers push card down well into palm of hand, Figure 8.
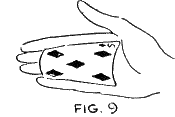
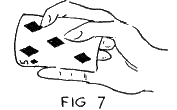
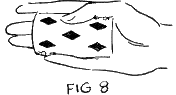
Figure 9 shows how card is held in palm. It is pressed against base of thumb and is clipped at outer corners between first and second and between third and fourth fingers.
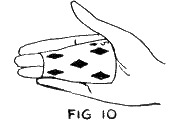
To get card from this position to back of hand again, push up on card with base of thumb, Figure 10.
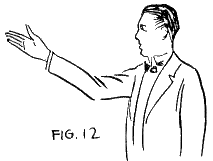
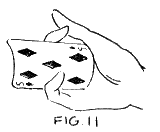
Curl fingers inward toward palm, keeping fourth and first fingers well over the card, Figure 11.
Straighten hand out and card is pivoted to back of hand again, Figure 12.
PRACTICE THE MOVES UP TO HERE UNTIL YOU HAVE THEM MASTERED BEFORE YOU GO FURTHER. WHEN YOU CAN GET CARD FROM FRONT TO BACK OF HAND AND BACK AGAIN EASILY, THEN CONTINUE WITH NEXT STEP.
Now, you must learn how to turn your hand in Back and Front Hand Palming to show it empty. The card must be concealed as you turn your hand, and this is the way you do it:
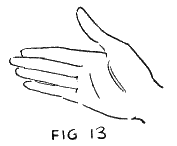
You have turned the card over onto the back of your hand, and you show empty palm, Figure 13.
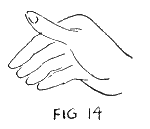
Turn hand toward the front, bending fingers slightly in toward palm, Figure 14.
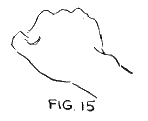
Continue turning hand. As it comes to position shown in Figure 15, card comes into horizontal position and is thus screened from audience.
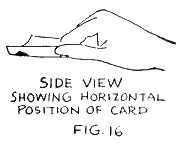
Figure 16 shows how card is held as hand turns. Audience does not see card at all as back of hand is toward them as in Figure 15.
Grasp card with thumb, push it down into palm with second and third fingers and clip edges between fingers as taught to you in Figures 6, 7, 8, 9.
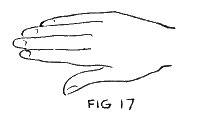
When card is in position with fingers straight, hold hand out with back toward audience. You have now shown front and back of hand with nothing apparently concealed, Figure 17.
To bring card to back of hand again, reverse movements. Turn hand upward and backward while you get card to back of hand again as taught to you in Figures 10, 11, 12. When turning hand to show palm empty, start with Figure 17 and work back to Figure 13.
You may continue this Back and Front Palming two or three times. Study your ANGLES OF VISIBILITY very carefully so as not to expose the card.
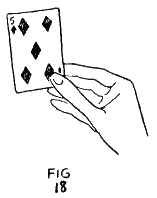
TO PRODUCE CARD:
Have card on back of hand and palm toward audience. Curl fingers inward as in Figure 3. Grasp card between tip of second finger and thumb. Release bottom corner of card from little finger and allow card to spring up. Place first finger at rear of card also and produce as shown in Figure 18.
When you have mastered your lesson this far and your mirror shows you that you are getting along well, begin to practice Back and Front Hand Palming with more cards. First use two, then three, four, and five cards as you progress.
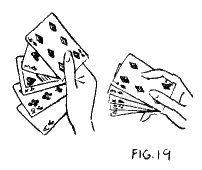
It is a pretty effect to start with a fan of five cards in right hand. Square them up with one hand by pushing up with your little finger and down with first finger, Figure 19.
When cards are all squared up, Back Palm them as one card and show palm of hand empty. Then turn hand and Front Palm the cards as one and show back of hand empty. Continue this two or three times.
TO PRODUCE CARDS IN A FAN:
Have cards on back of hand and palm toward audience. Follow method for producing one card, as taught above. When cards are at finger-tips, move thumb upward and fingers downward and cards will fan.
REMEMBER, THAT MOST SLEIGHTS ARE DONE RATHER QUICKLY.
Study and analyze them slowly, but keep practicing them faster and faster as you master them. You will find that after you know the movements, it is easier to do them fast. There is a certain speed necessary for graceful movements, yet do not overdo it.
Simplified Back and Front Hand Palm
This is a favorite method of Paul Fuchs, a clever manipulator. It eliminates a number of movements and thus simplifies matters. You must watch ANGLES OF VISIBILITY carefully in this method.
To Perform:
Back Palm card and show palm as in Figure 13. Turn hand in usual manner shown in Figures 14, 15, 16. Instead of straightening fingers, however, go only as far as Figure 15. Audience sees part of back of hand and believes that Magician has shown all of back of hand.
Then turn palm of hand to audience again, concealing card on back of hand.
This method is really nothing but a series of movements in which you open and close hand as you turn it.
This effect is very pleasing when Mr. Fuchs shows his hand empty and suddenly produces a fan of a dozen cards.
Production of Cards One at a Time from Back of Hand
Method 1—
A number of cards, say five, are Back Palmed on right hand and palm of hand is shown empty.
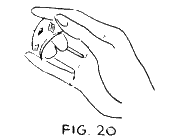
Curl fingers inward and place thumb on corner of cards, Figure 20.
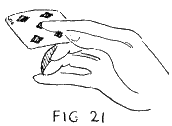
Push outer card upward a little with thumb and release lower corner from little finger, Figure 21.
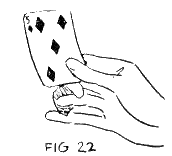
Hold cards securely by pressing thumb down on second finger. Raise first finger and put it back of top card, Figure 22.
Push first finger down to lower corner of outer card. Straighten fingers out, bringing remaining four cards on back of hand again. The produced card is exposed between thumb and first finger, Figure 23.
Drop card to table or floor, then produce two more cards in the same manner. Before producing the last two, show both sides of hand empty and suddenly bring out the fourth card and then the fifth.
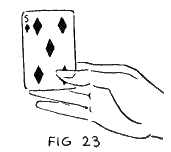
Many conjurers bring hand to position shown in Figure 15 as they produce each card and then to position in Figure 23.
This production requires artistic presentation. Practice until you can make the cards appear at your finger-tips as though you suddenly plucked them from the air.
Method 2—
The effect is similar to that produced by Method 1, but the mode of operation is different.
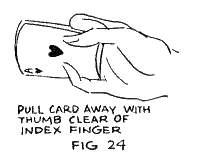
Hand is in position in Figure 13 with cards on back. Curve fingers in and place thumb on outer card. Push down card with thumb until it is free of first finger, Figure 24.
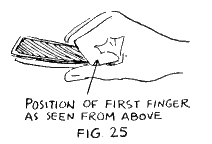
Bring index finger back of outer card, Figure 25.
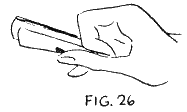
Push index finger between outer card and remaining four cards. Grip outer card between thumb and back of first joint of index finger, Figure 26.
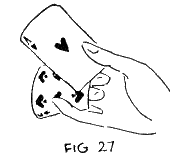
Release lower corner of outer card from little finger, Figure 27.
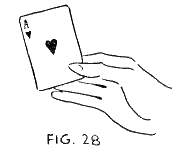
Straighten fingers. The four cards are concealed again on back of hand and the produced card is shown between thumb and forefinger of right hand, Figure 28.
Production of Cards One at a Time from Front of Hand
In this production back of hand is shown to audience.
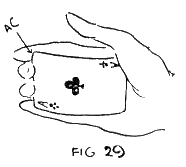
Palm several cards, say five, in regular fashion. Corner AC is gripped right in the ball of the forefinger, Figure 29.
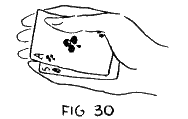
Place thumb on top card about half an inch from corner AC. Push outer card upward diagonally about an inch or so, Figure 30.
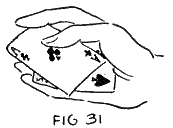
Raise first finger and place it in front of corner AC, Figure 31.
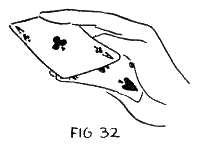
Grip corner between first and second fingers and pull card to horizontal position. Put thumb under card, Figure 32.
With aid of thumb, push card into position shown in Figure 33.
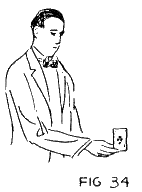
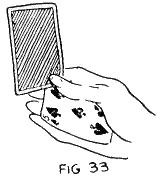
Figure 34 shows how production looks to audience. Card appears suddenly at finger-tips as if it came out of the air.
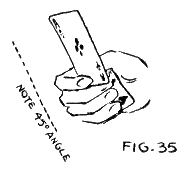
NOTE:
The ANGLE OF VISIBILITY is very important in this production. Hold your hand at a 45-degree angle in relation to your body. You can then conceal the palmed cards well as you produce them, one at a time, even if fingers widen a bit during movements, Figure 35.
Just before making the production, it is easy for you to palm off the cards from the deck. After you have produced these, palm a few more and continue the production if you desire.
This production is a favorite of Howard Thurston, one of the foremost Magicians of the day.
To Vanish Cards One at a Time and Produce Them Again
A special stand for holding cards comes in handy for this effect. If you want to have one, secure a stand used for display purposes in show windows and have clips soldered on to it, Figure 36.
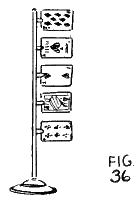
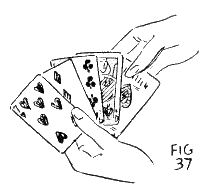
It is not necessary to have the stand, however. Start with a fan of cards in your left hand — say, five cards. Cards are fanned toward the right so that it will be easy to remove each one. If desired an assistant can hold cards, Figure 37.
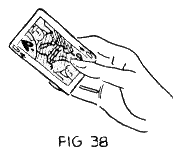
Take first card with right hand and with a slight tossing motion upward, vanish it on back of right hand. Then take next card in position shown in Figure 38.
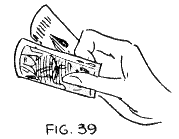
Hold it even with first card in preparation for vanishing it also by Back Palming. Notice position of thumb, Figure 39.
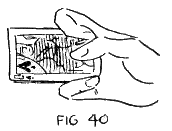
Curl fingers inward. Get the two cards together and Back Palm them both, thus vanishing the second card, Figure 40.
Now by Back and Front Palming the two cards together, show both sides of right hand empty.
Vanish the remaining cards in the same way. It is not necessary to show both sides of hand after each vanish, but show them occasionally to convince audience that you have nothing concealed.
To produce cards again, use either method for producing cards one at a time, taught to you above. As cards are produced, place the first three in left hand in a fan.
Produce the fourth card, and as you place it in fan in left hand, curl fingers of right hand inward and place fifth card in horizontal position BEHIND other four cards.
Figure 41 shows view toward audience.
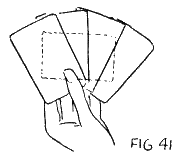
Concealed card is held in place by second finger of left hand as right hand is immediately brought away from left.
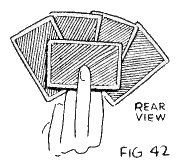
Figure 42 shows view away from audience.
As you bring right hand away from left, keep fingers close together. Show back and front of hand as though you were Back and Front Palming a card. Keep thumb tight against hand to make it conspicuous. With back of hand toward audience, push thumb far up into palm of hand and suddenly open fingers. It looks as though you were concealing something in the palm of hand.
Close fingers again and quickly turn hand to expose palm, keeping thumb tight against first fingers as though holding something. Open fingers wide apart, one at a time, and finally the thumb. Now quickly show both sides of hand with fingers spread apart.
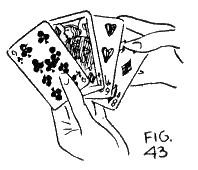
Bring right hand down to left. Starting with upper card, count the cards with thumb of right hand pointing to them and fingers back of cards. As you count — Four — Back Palm the concealed card in right hand, Figure 43.
Grasp the fourth card between thumb and fingers of right hand and throw it aside. Then throw the other three cards aside, one at a time, tossing them up into the air. Show left hand empty.
Back and Front Palm remaining card in right hand to show right hand empty. Then suddenly produce fifth card at finger-tips and toss it into the air also.
This routine of manipulation may be varied. Some Magicians prefer using six cards instead of five and placing two cards behind the fan instead of one.
Color Changes With Cards
The effect produced in a Color Change is this: The face of the "Bottom" card on the deck is shown. The hand is passed over the card and it suddenly changes to another number and color. You are given a number of methods. Select the one or two you like best.
THE PHANTOM PIP:
EFFECT:
Performer shows a Three of Spades on bottom of deck. He reaches up with right hand and apparently removes the center pip, leaving the Two of Spades. He snaps invisible pip into the air and shows right hand empty. Then he reaches into air again, gets invisible pip and puts it on the Two of Spades — and behold, the Two changes back to the Three of Spades again.
To Perform:
Place the Two of Spades on the "Top" of the deck and the Three of Spades on the "Bottom."
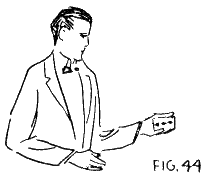
Hold deck in left hand with Three of Spades facing audience. Have your right side slightly turned to audience, Figure 44.
"A very peculiar thing about the Three of Spades is that if you pass your hand over it in this direction, nothing happens to the card."
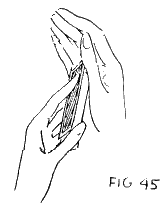
Pass right hand across deck from right to left. When hand gets to position shown in Figure 45, push the rear card, the Two of Spades, forward into the right hand so that it can be grasped between thumb and second joint of little finger.
Figure 46 shows the way the card is held in the right hand.
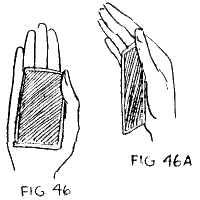
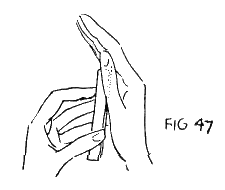
Figure 46A is the view from above as you see card in hand.
Figure 47 shows the way the left hand pushes card into right hand where only the two upper corners are gripped between right fingers.
The right hand must pass the deck in a continuous motion while it picks up the card. There must be no hesitation. Continue moving right hand to the left about 12 inches, raising it to show the Three of Spades again.
"But if you run your hand over the card in this direction."
Bring hand back across the deck and without stopping movement, place the Two of Spades over the Three. The moment card is in place pretend to pick off center pip of the Three spot. Remove right hand and show that center pip has been taken off and a Two spot is there instead of a Three. Toss invisible pip into the air.
"You can pick one of the pips off!"
With right forefinger point to place where pip was and push card up about a quarter of an inch to get a jog at the top, Figure 48.
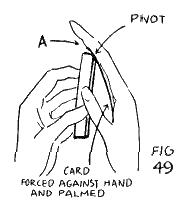
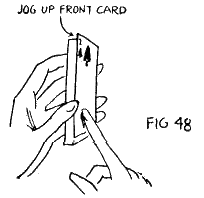
Reach up into air to pretend to catch pip. Bring hand down over pack. Press down on jogged end of the Two of Spades. This forces the card into right hand where it is palmed.
Figure 49 shows view from above as you see hands, but not as the audience sees them.
Bring right hand away to show the Three spot. The pip has apparently reappeared.
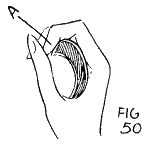
As you bring right hand toward your body, curve fingers inward until edge A can be held by thumb, Figure 50.
Then bring right hand up to deck to point to center pip of the Three spot with fingers, Figure 51.
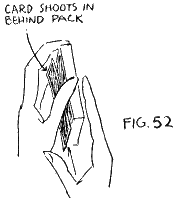
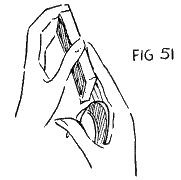
Release edge A from thumb. This causes card to spring up behind deck. Hold it in place with rest of cards in left hand, Figure 52.
Remove right hand from deck and show it empty. A good. natural move is to snap card into place under cover of transferring deck from left to right hand.
This last move of causing a palmed card to spring up behind the deck was given to me by Paul Fuchs, whom I mentioned earlier in this lesson. In his hands it is a beautiful piece of deception. It may be used in effects when you want to add one or more palmed cards to the back of the deck while the front is exposed.
BACK HAND COLOR CHANGE:
EFFECT:
Face card on deck changes to a different number and color. This is another effect of Paul Fuchs.
To Perform:
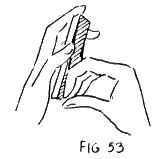
Turn left side toward audience. Hold deck in left hand with backs of cards toward rear. Place left little finger under top card in readiness for Palming. Curve fingers of right hand and place them against lower edge of card, Figure 53.
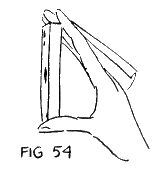
Grip one edge of card between first and second fingers and other edge between third and fourth fingers in readiness for Back Palming. Straighten fingers and Back Palm the card. Place deck in right hand to show face card to audience, Figure 54.
The Back Palming must be done in an instant as you pass the deck from left to right hand.
Bring left hand up past the deck to the right about 12 inches away. Do not cover cards. Move right hand
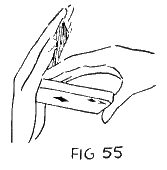
up to left. Under cover of left hand, turn right hand enough to get Back Palmed card into left palm, Figure 55.
Bring pack back to original position facing audience. Bring left hand with Palmed card back to the left over the deck.
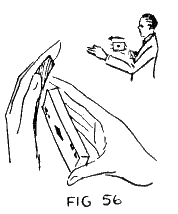
Figure 56. The small diagram shows the movement of the left hand to the right over the deck and nothing happens to the exposed card.
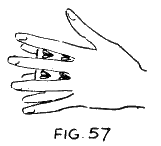
Now hand is brought back to the left and palmed card is placed over card on the deck. The moment card is in place, open fingers wide and continue motion of left hand to the left, Figure 57.
The effect is that the color change came about with your fingers wide open. To the audience it appears that you merely moved right hand past left hand and card changed. This illusion is produced when you move right hand up to left. (See Figure 55).
OPEN FINGER COLOR CHANGE:
EFFECT:
This is a fine color change as pack is in view all the time except for a moment when hand covers it once. Immediately fingers open wide, revealing the color change.
To Perform:
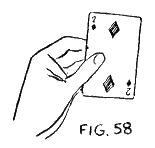
Hold deck in left hand. Right side is turned toward audience and left arm is extended about 18 inches from body. Face of "Bottom" card of deck is exposed to audience, Figure 58.
Bring right hand over to left to take deck. Grasp deck with thumb at bottom and first two fingers of right hand at top, Figure 59.
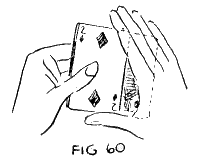
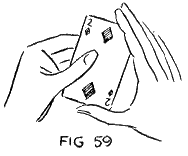
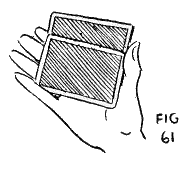
The moment you grasp deck with right hand, push the "Top" or rear card down with left fingers into right hand until upper corner is gripped between third and fourth fingers and opposite corner at base of thumb.
Figure 60 shows view toward audience with back of right hand screening completely the card being pushed out.
Figure 61 shows view away from audience with concealed card pushed into right hand.
The moment card is adjusted, deck is held in right hand and left hand is shown empty, Figure 62.
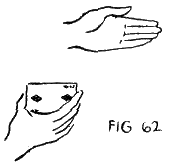
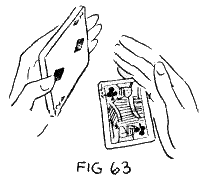
Transfer deck back to left hand, cards still facing audience. Release grip from thumb on concealed card in right hand and let it fall into horizontal position gripped between third and fourth fingers.
Figure 63 is view from above as you see hands.
Hold right hand about six inches below deck to show front card on deck. Bring right hand up to deck and place concealed card on it, Figure 64.
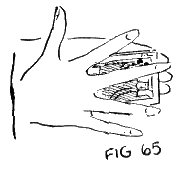
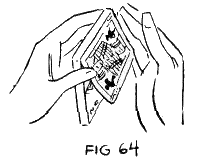
Place right hand over deck, immediately opening fingers wide so that audience can see sudden change of card through fingers, Figure 65.
Remove right hand and show color change.
SLAP CHANGE:
EFFECT:
Face card of deck is slapped with right hand and when hand is removed, card is found to have changed to another. The striking of the cards adds smartness to this effect.
To Perform:
Hold deck as in Figure 58. Show right hand empty, then grasp deck at top and bottom, Figure 66.
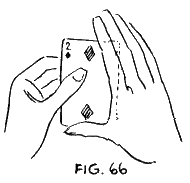
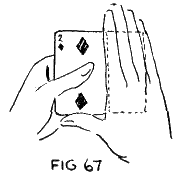
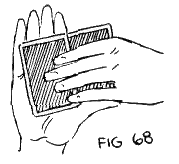
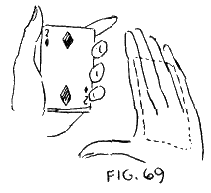
With second and third finger-tips of left hand push "Top" card into right palm.
Figure 67 shows view toward audience with card concealed in right palm.
Figure 68 shows rear view away from audience, with concealed card Palmed in right hand.
Separate hands and bring right hand back in front of left in preparation for slapping deck, Figure 69.
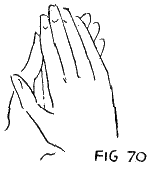
Slap right hand down smartly on deck, leaving the Palmed card on the deck, Figure 70.
Remove right hand and show that card has changed.
NOTE:
This experiment is often begun by holding deck as in Figure 66. Pack is then placed in left hand, and during this movement, "Top" card is slid into right palm.
This change may be used in producing selected cards. Three or four cards are selected by spectators and returned to deck. These are brought to "Top" of deck by the Simplified Pass. Each one is then in turn Palmed in right hand, as taught to you above, and produced on front of pack by the Slap Change Method.
PUSH UP COLOR CHANGE:
EFFECT:
This is similar to the change produced in the Phantom Pip.
To Perform:
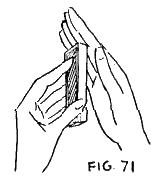
Hold cards as in Figure 71. With tip of left forefinger push rear card outward. Cards and hands are held horizontally. This view is from above as you see hands.
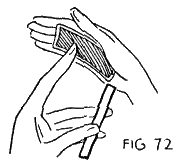
With aid of right hand and left forefinger, get rear card up into palm of right hand, where it is Palmed in regular fashion, Figure 72.
Bring right hand back across pack again, placing Palmed card on front of pack. Remove hand and show change.
Use same "Patter" as in the PHANTOM PIP.
THUMB STEAL COLOR CHANGE:
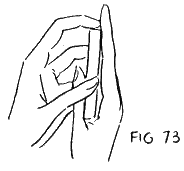
To Perform:
Hold deck in regular manner in left hand, faces of cards toward audience. Bring right hand up to deck, placing fingers in front of it and thumb behind it, Figure 73.
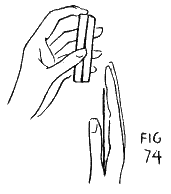
Press down on rear card with right thumb and draw hand away, bringing card with it, gripped in crotch of thumb, Figure 74, next page.
Cover front card on deck with right hand, leaving concealed card on it. Then remove hand and show change of front card. Several cards can be slipped from back by pushing down with left forefinger and cards produced in fan from various parts of body.
DOUBLE CARD CHANGE:
EFFECT:
In this experiment, two cards change instead of one.
To Perform:
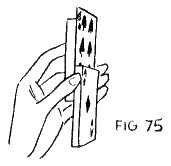
Split deck about in half and pull down outer section. Push up face card of rear section a little, Figure 75.
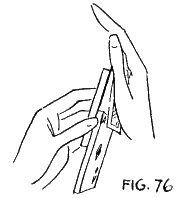
Pass right hand over upper section of deck. Push rear card forward with left forefinger until you can grasp it between thumb and little finger of right hand. Bring hand with Palmed card down in front of face card of upper section and grasp that card in similar manner. The two cards are now Palmed in right hand, Figure 76.
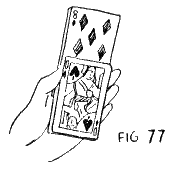
As right hand passes back over the deck again, place the two Palmed cards on lower section of deck. Remove right hand and show it empty. Call attention to the double change on the deck, Figure 77.
You may work this in pantomime or use this "Patter":
"If you pass your hand over the deck once, nothing happens."
Palm off the rear card, then show that cards are still the same.
"But if you pass your hand over them twice, one card changes."
Palm off face card of upper section, together with the rear card. Then show that one card has changed.
"However, the third time over, changes the bottom card as well."
Place cards over front card of lower section and show change.
SLIP UP COLOR CHANGE:
Credit for this is due to Charles Leedy, a fellow Magician.
To Perform:
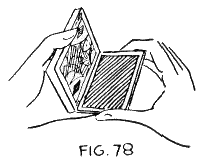
Deck is cut in two parts, one held in each hand. Keeping hands close together, drop part in right hand enough so that audience can see front card of left-hand section, Figure 78.
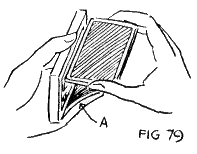
Pull right-hand packet upward against left-hand one. As you do so, curve left fingers, press tight against "Bottom" card of right-hand section, and separate it from rest of section, Figure 79.
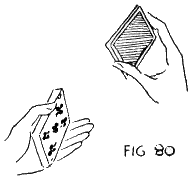
Remove right-hand packet and allow "Bottom" card to spring up against front of left-hand section. Bring right hand up high above left hand to show change of front card of left-hand section, Figure 80.
TOP CARD CHANGE:
This is very important in card work. The sleight has many uses. You may show front card of deck and suddenly cause it to change. You may locate a selected card by causing the front card to change into it, etc.
Method 1 —
Have a card selected, remembered, returned to middle of deck. Bring card to "Top" of deck with the Simplified Pass.
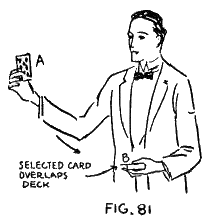
Riffle front edge of deck with right finger-tips, and as cards fall, have spectator tell you where to stop. When he says — Stop — you remove card at that point and show it. This is card A. Hold it between first and second fingers of right hand. Hold deck in left hand down at about your waistline. Push selected card — B — on top of deck over to right about half an inch, Figure 81, next page.
Have spectator who selected card stand a little in front of you at your right and another spectator in the same position at your left.
Show card A to spectator at right.
"Is this the card you selected, sir? No?"
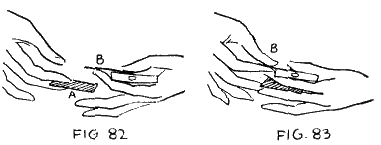
Turn to spectator at left. As you do so, bring card A up to left hand. Quickly place it between first and second fingers of left hand, and at the same time, grasp card B between thumb and first finger of right hand, Figures 82 and 83.
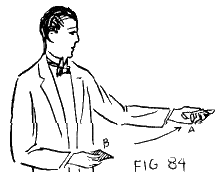
Leave Card A in left hand and remove card B in right hand. Immediately move left hand to left, pointing forefinger to spectator and thus releasing card A, which now comes together with rest of pack. Hold B in right hand so that face is not exposed, Figure 84.
You must not look at your hands in making this change and the audience will not suspect anything. They believe that you still hold card A in your right hand.
Say to spectator at left:
"Would you know the gentleman's card if you saw it?"
Then to spectator at right:
"By the way, what was the card you selected?"
Spectator names card.
"Blow on this indifferent card."
Have spectator blow on card B, then turn it over and show it to be selected card.
"I thought so!"
Method 2 —
This change is done without the spectators on each side of you, otherwise it is similar to Method 1.
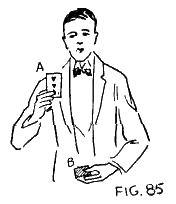
Hold card up in right hand. You must look straight at audience, not at hands, Figure 85.
Bring card down to pack, make the change, and bring card B above or below the pack about 12 inches. You must pretend to be making a gesture while you make the change.
Method 3 —
This is used when it is necessary to get card A to the top of the deck instead of the bottom.
Hold card A up between thumb and forefinger in right hand. Push card B to the right a little on deck.
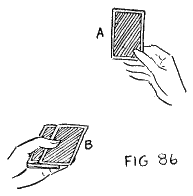
Figure 86 is a view away from audience as you see cards.
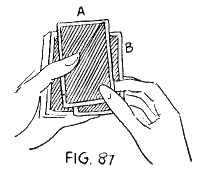
Bring card A down to pack. Grasp B between first and second fingers of right hand, and place thumb of left hand over A, Figure 87.
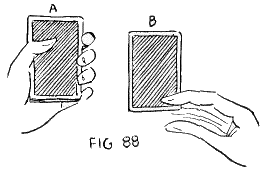
Separate hands, drawing B away in right and leaving A on top of pack — and the change is made, see Figure 88.
This is a good change to use when turning body from left to right. First show A to people at left, then turn to right and show that card has changed.
Method 4 —
A good method for top card change.
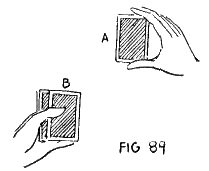
Hold card A up in right hand with thumb at bottom and first two fingers at top. Hold deck in left hand with B pushed over to right, Figure 89.
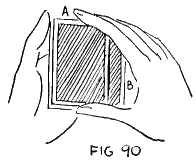
Bring A down on pack and grasp B between thumb and second finger of right hand, Figure 90, next page.
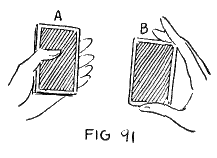
Draw right hand away with card B, and the change is made, Figure 91, next page.
This is a good change to use while turning body slightly from left to right. Make the change as right hand passes over the deck.
IMPORTANT: STUDY THESE CHANGES CAREFULLY. WATCH YOUR ANGLES OF VISIBILITY AND NATURALNESS OF GESTURES. MAKE THE CHANGES UNDER COVER OF LARGER NATURAL MOVES, SUCH AS TURNING BODY SLIGHTLY OR PASSING HAND BACK AND FORTH OVER THE DECK. SPEAK TO A SPECTATOR DURING THE CHANGE AND KEEP YOUR EYES ON HIM, NOT ON HANDS, FOR MISDIRECTION. IT WILL PAY YOU TO PERFECT THESE CHANGES FOR THEY ARE THE BASIS FOR SOME GOOD CARD MAGIC.
Bottom Dealing
This requires practice, but when you have it mastered, you have a big trick up your sleeve. The method I teach you here is that used by Cardini, great English Magician. He does it so perfectly that the closest eye cannot detect that he is dealing from the bottom instead of the top of the deck.
EFFECT:
Performer deals off indifferent cards from top of deck and they suddenly change into selected cards (because of Bottom Dealing). Magician causes selected card to appear at any number in the deck which spectator chooses. Spectator then chooses any place in the deck and Magician deals off an Ace, apparently from that place, but in reality from the bottom of the deck.
To Perform:
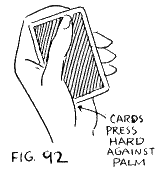
Hold deck in left hand, backs of cards up. Curve fingers upward and press cards firmly against base of thumb, Figure 92.
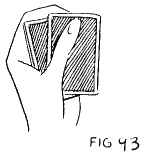
Move top card over to the right with thumb, Figure 93.
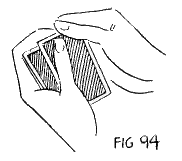
Place right thumb at corner of top card and first finger of right hand under bottom card of deck in left hand.
Figure 94 shows view from above.
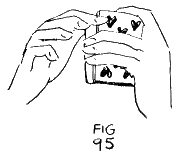
Figure 95 shows view from underneath to make finger positions clear to you.
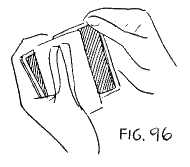
Pull out bottom card, holding it between thumb and first finger of right hand. Card comes straight out from deck. At the same time, draw top card back onto deck with left thumb, Figure 96.
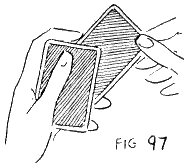
Bottom card may be removed diagonally instead of straight if desired. Figure 97 shows method of doing this. Top card is shown already squared up on deck by left thumb.
When Cardini deals from the bottom, as he pulls card away in right hand, he throws left hand with a turn to the left and snaps card down on the table with the right. He deals as fast from the bottom as he does from the top.
Study your motions so that there is no apparent difference between regular dealing and bottom dealing. Practice well the art of sliding top card back and forth easily with left thumb.
Dealing Seconds
Another handy sleight for apparently dealing from top but in reality dealing the second card from top. This is the method Cardini uses.
EFFECT:
Performer deals cards from top, apparently, but really holds back top card as long as he desires. Cards are made to appear at any number between one and ten.
To Perform:
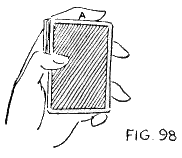
Hold deck in left hand. First finger is at outer edge of cards and little finger is at lower corner. Thumb is well back toward left edge of deck, Figure 98.
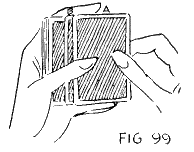
Push left thumb to right, thrusting TWO cards with it. Bring right hand to deck. Place thumb over card A and first two fingers under card B, Figure 99.
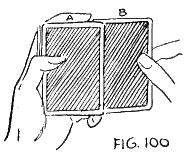
Draw left thumb back to original position, bringing top card A with it. This leaves second card B in right hand, Figure 100.
Snap card down on table with right hand and move left hand to left a little.
Dealing must be done in a natural manner without looking at deck. Both Bottom and Second Dealing should be done with the sense of touch.
Modern Card Change
This is a good method for indetectably changing one card to another.
To Perform:
Get selected card to top of deck. Do the Double Card Lift, showing face of second card from top as top card. Place the two cards on bottom of deck so that they extend a little to the right. Hold deck in left hand with cards facing audience.
Figure 101 is view as you see cards.
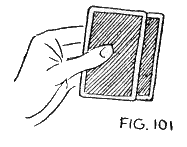
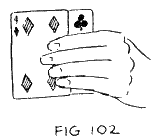
Figure 102 shows how cards are held toward audience. Thumb is at rear and fingers in front of deck.
Turn cards so that audience can see the backs. Place right thumb back of second or selected card and fingers in front of the first card at bottom of deck, Figure 103.
Remove the second card with right hand and at the same time, push the first card back with left fingers, squarely on to the deck.
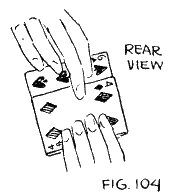
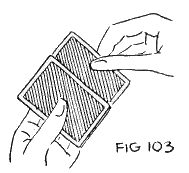
Figure 104 shows this move from underneath. The first card is square upon the deck and second card is about to be removed in right hand.
Separate hands. Right hand carries card to the right side with back of it still to audience. Audience believes it to be the first card which they saw. Turn card over and show it to be the selected one.
Be careful not to expose first card at bottom of deck in left hand.
Single Hand Card Change
This change is performed with one hand.
To Perform:
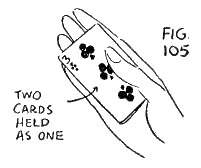
Lift two cards from top of deck and show as one. Hold in right palm with lower corner in crotch of thumb, Figure 105.
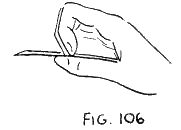
Turn hand over, and as you do so, curl in your fingers, Figure 106.
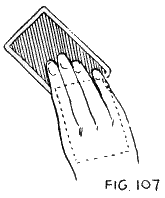
Straighten fingers out again, forcing top card out to tips of fingers and second card back into palm of hand where it is Thumb Palmed, Figure 107.
Force top card out on to table. Bring right hand quickly back to deck in left hand and place concealed card on top of deck. Card on table is shown to have changed.
This move may be made to appear natural by throwing card to table with right hand and merely finishing the movement by bringing right hand back to deck.
The Ribbon Drop
EFFECT:
A pretty card flourish in which cards drop quickly and evenly from right hand down to left, held about 12 inches below. The even dropping gives the effect of a ribbon. Use new cards to get the best results.
To Perform:
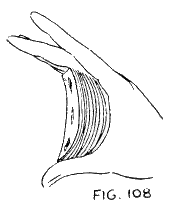
Turn left side to audience. Hold cards in right hand as shown in Figure 108.
The grip comes between thumb and second finger, and the other fingers assist lightly in holding cards. Push second finger and thumb inward a little so that pack is curved and cards spread slightly apart.
Turn right hand to horizontal position, holding it at about a 45-degree angle, Figure 109.
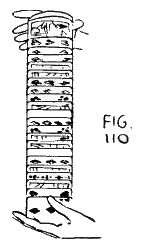
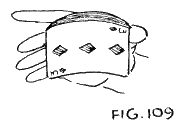
Hold left hand 12 to 18 inches below right. Gradually release pressure on cards with thumb and second finger. Allow the cards to fall evenly in a ribbon effect into left hand. Cards face audience, Figure 110.
It takes practice to master this flourish, but when perfected, it is pretty.
The Cascade
EFFECT:
This is similar to The Ribbon Drop but the cards are curved and fall in a cascade.
To Perform:
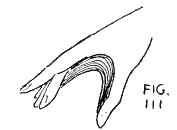
Hold cards in the same way as you do for The Ribbon Drop, but press down harder on the cards to get a greater curve in them, Figure 111.
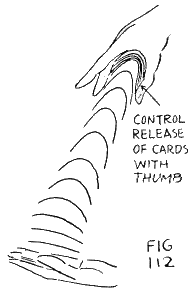
Release pressure on cards with THUMB and draw thumb back over edges of cards a little. This causes the cards to fall one after another rapidly into left hand. CONTROL OF THE CARDS IS WITH THE THUMB. Cards fall with faces downward and edges to audience, Figure 112.
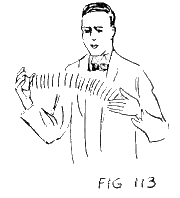
Another method of Cascading cards is to force the cards across from right to left hand horizontally, see Figure 113.
The One-Handed Cut
Another flourish with cards in which the pack is cut while held in one hand.
To Perform:
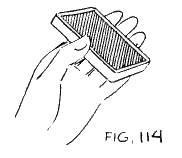
Hold pack between fingers and thumb, backs of cards up, Figure 114.
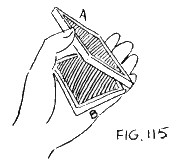
Allow about half of the pack to drop into palm, making sections A and B, Figure 115.
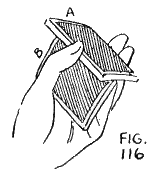
With tips of FIRST finger and LITTLE finger, push against B, raising it up under A, Figure 116.
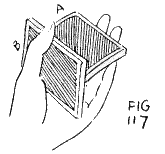
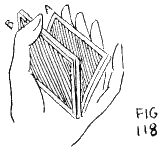
Continue raising B until it is free of A and A drops down toward palm, Figure 117.
The moment B is free from A, transfer first finger to A to control it and lower it evenly, Figure 118.
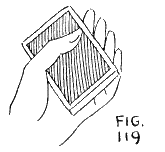
When A has dropped into position, let B fall on top of it and the cut is completed, Figure 119.
PRACTICE THIS CUT WITH BOTH HANDS. Then try holding half of deck in each hand and cutting them simultaneously. This method of cutting is similar to the REGULAR PASS.
This lesson has covered some interesting and valuable card sleights. With a little ingenuity on your part, you can work them into many tricks. You can introduce flourishes and production and vanishing of cards here and there for variety. A number of methods for doing the same thing are taught to you so that you can pick out the method which is easiest for you and which you like best. Practice and perfect the methods which suit you best.

TARBELL SYSTEM, INCORPORATED, Chicago.
LESSON 36
More wonderful card effects in this lesson — effects used by great magicians and other clever effects which you will be mighty glad to know and use. Experiments with Four Aces, with Rising Cards, and with Fountains of Cards.
Book contents
Introduction
Core card lessons
- Lesson 9 — The Principles of Card Effects
- Lesson 12 — Cards That Pass in the Night and Cards Up the Sleeve
- Lesson 13 — Review, the Regular Pass and Card Stabs
- Lesson 14 — The Force, Card and Orange, and Banana Effects
- Lesson 15 — Card Positions, Palms, Shifts and Discoveries
- Lesson 16 — Card Penetrations Through Boards and Handkerchiefs
- Lesson 17 — Snap It, Flash Production and the Glass House
- Lesson 18 — Rising Cards
- Lesson 19 — More Rising Card Effects
- Lesson 34 — Twelve Impromptu Effects with Cards
- Lesson 35 — Sleight of Hand with Cards
- Lesson 36 — More Card Magic
Additional card effects
- Lesson 26 — A Card and Ribbon Mystery
- Lesson 29 — The X-Ray Cards
- Lesson 31 — Blindfold Card Reading and A Mystic Discovery
- Lesson 45 — Spirit Photography
- Lesson 54 — The Card Slot